Heading out the door? Read this article on the new Outside+ app available now on iOS devices for members! Download the app.
Let’s be honest: You can “fake” or cheat some yoga poses, for sure. I don’t mean using props, practicing against the wall, or sitting in a chair. That’s 100% real yoga.
What I mean is when you’re in a posture, but doing it half-heartedly. Say you know you should be engaging a muscle group but aren’t. Or you’re flowing from pose to pose but moving with lackluster energy. Or you’re moving your body, but your head or heart isn’t into it.
If you just don’t have it in you, physically or mentally, well, that’s how it is sometimes. Forgive yourself and look forward to the next time you meet your mat. But when you’re only pretending to give it your all, that may be your call to study the concept of satya, or truthfulness, in your practice.
The second of the five yamas, satya invites you to explore not just what is factual, but what is deeply honest and true. That applies not only to the words you speak, but to how you move through the world—including in your yoga practice. If you are being presented with an opportunity to explore the concept of satya, it may invite you to pay closer attention to the details of your structural alignment in the pose. But you may also ask you to be more conscious of your inner dialogue as you practice, or your reason for coming to the mat in the first place.
Truthfulness evolves from self exploration and self awareness. So ask yourself what is standing between you and a yoga practice that feels genuine? Are you stressed out or distracted? Do you need to work on mobility or balance? Maybe you need to build strength in order to arrive in and hold the pose. Deep down you–and only you–can discover the truth of your practice.
This may be the time to incorporate asanas that require deep focus and ask for your full physical, mental, and emotional integrity as you practice. Here are seven poses to incorporate into your practice to help you focus on the concept of satya.
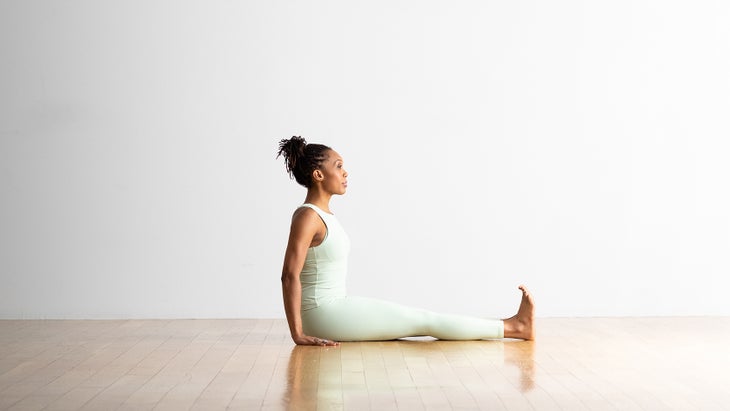
Dandasana (Staff Pose)
Dandasana is a pose that appears to be simple, but requires utter concentration on your posture, muscle engagement, and alignment. Pay attention to the details.
- Begin seated with your legs extended forward. Touch your big toes together and keep a small amount of space between your heels. Flex your ankles, drawing your toes back toward your body.
- Bring your hands alongside your hips and straighten your arms.
- Rotate your inner thighs in and down and press them toward the floor.
- Extend your sternum up and away from your navel and broaden your collarbones. Draw the heads of your upper arms back while softening your front ribs.
- To exit the pose, release your arms and shake out your legs.
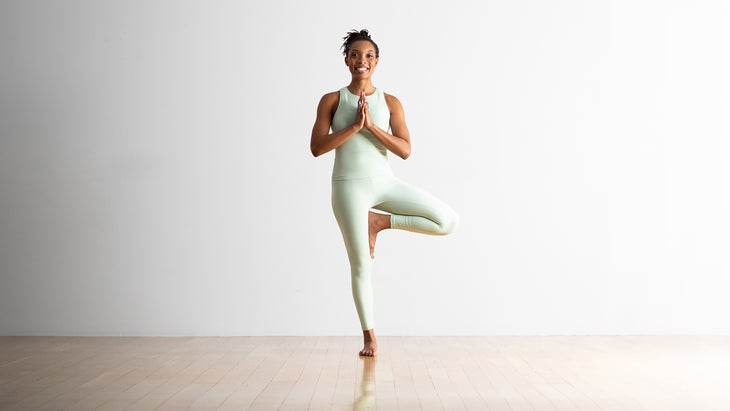
Vrksasana (Tree Pose)
Asymmetrical balance poses like Tree require you to find and maintain your center of gravity in order to remain in balance. You have options for the placement of your bent leg—to place it high on the opposite thigh, on the calf, or at the ankle. Your choice depends on you being honest about what position will allow you the most stability.
- Stand in Tadasana (Mountain Pose). Spread your toes, press your feet into the mat, and firm your leg muscles. Raise your front hip points toward your lower ribs to gently lift your lower belly.
- Inhale deeply, lifting your chest, and exhale as you draw your shoulder blades down your back. Look straight ahead at a steady gazing spot.
- Place your hands on your hips and raise your right foot onto your left thigh, shin, or ankle. (Don’t press it against your knee!)
- Press your right foot and left leg into each other. Check that your pelvis is level and squared to the front.
- When you feel steady, place your hands in Anjali Mudra at the heart or stretch your arms overhead like branches reaching toward the Sun.
- Hold for several breaths, then lower your right foot into Mountain Pose and repeat on the other side.
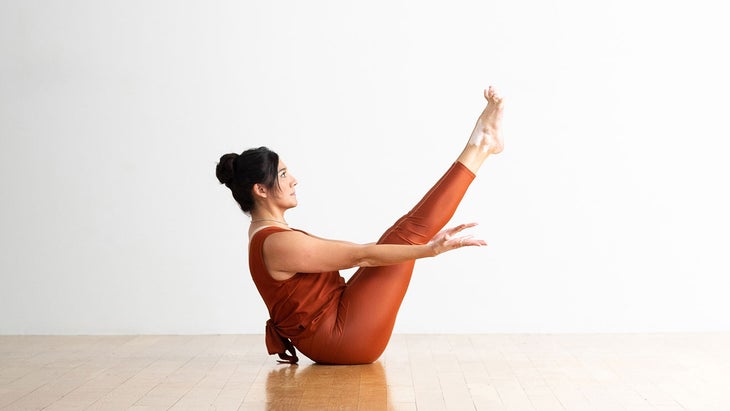
Paripurna Navasana (Boat Pose)
Some instructions for Half Boat suggest that you curve your spine a bit and allow your legs to hover low over your mat. But a full Boat requires you to keep your chest lifted, your spine straight, and your legs high off the mat. Your spine is long and straight, and your legs are fully extended which demands a lot of your hip flexors. This pose requires you to sincerely engage your abs. You may not be able to stay in Full Boat Pose long, but that’s OK. Don’t compromise the integrity of the pose to remain in it longer. You can also practice variations such as bending at your knees as you build strength.
- Sit on the floor with your legs straight in front of you. Place your hands on the floor a little behind your hips.
- Lift through the top of the sternum and lean back slightly, making sure your back doesn’t round. Balance your weight on the tripod of your sitting bones and tailbone.
- Exhale and bend your knees, then lift your thighs so they are angled about 45 degrees above the floor, with your knees still bent.
- If possible, slowly straighten your knees, raising the tips of your toes slightly above the level of your eyes. If that is not possible, keep your knees bent and your shins parallel to the floor.
- Keeping your chest open and your spine long, draw your shoulders back and extend both arms forward alongside the legs, parallel to the floor, with your palms facing in. Try to keep your lower belly engaged.
- Point your toes or flex your feet to draw your toes back toward your body and breathe. Try to stay in the pose for 10 to 20 seconds, slowly increasing your time to a minute or longer.
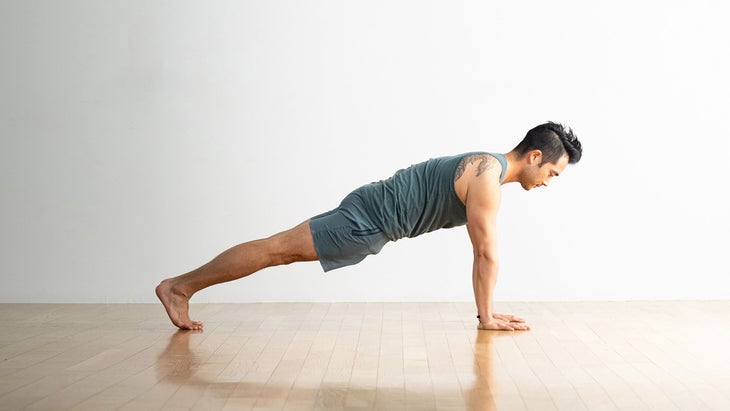
Plank Pose
To be true to Plank Pose, you have to be mindful of your hips. It’s easy to lift them too high, as if you’re moving toward Downward-Facing Dog, or sag them down toward a half-hearted Upward-Facing Dog. Plank requires integrity in the shoulders as well. Press your hands into your mat and push yourself away from the floor. Widen your shoulder blades and lengthen your neck, but don’t round your back.
- From Tabletop, inhale, and extend the sternum away from the navel, opening across the chest and coming into a Cow tilt.
- Exhale and practice just enough Cat tilt to simultaneously tone the lower belly and lose any trace of a backbend in the lower back.
- Maintaining this neutral spinal position, move your feet back and straighten your legs to come into the top of a push-up or Plank.
- Lift the your thighs to the ceiling while lowering your tailbone toward the floor in order to keep space at your lower back. Your lower belly should feel like a tray supporting your lower back.
- Maintain tone in the pit of your lower belly while extending your sternum forward and pressing your heels back, creating a straight, taut line of energy from the crown of your head through your feet.
- Stay in this position for up to a minute at a time.
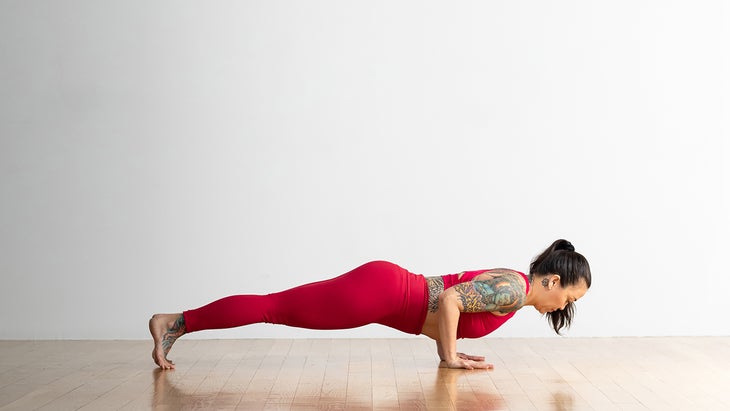
Chaturanga Dandasana (Four-Limbed Staff Pose)
Chaturanga is another pose that asks you to keep your body aligned from head to toe, keeping the natural curve of the spine neutral, but engaging the strength of your abdominals and your arms and upper body. “If you allow your shoulder blades to move toward your ears, you will destabilize your shoulder joints and make the pose much harder,” writes Judith Hanson Lasater, her book Yoga Myths. Instead, keep your shoulder blades moving down your back and close to each other.
- From Plank Pose, align your shoulders slightly ahead of your wrists and come onto the balls of your feet.
- Push back through your heels to engage your quadriceps as you reach your sternum forward, creating a straight, taut line of energy from the crown of your head through your feet.
- On an inhalation, draw your shoulders and your thighs up and away from the floor. Pull your lower body up and in, and release your tailbone toward the floor.
- On an exhalation, bend your elbows and slowly lower your body (keeping it as straight as a plank of wood) until your elbows are at around 90 degrees. Keep your elbows directly over your wrists and drawn in against your sides. Press your hands firmly into the floor.
- Bring your gaze to the floor, about 6 inches in front of you, and continue to lower until your shoulders are at the same height as your elbows.
- Continue to reach through the heels, sternum, and crown of your head as you breathe.
- To come out of the pose, exhale and lower down to your belly or push back up to Plank Pose.
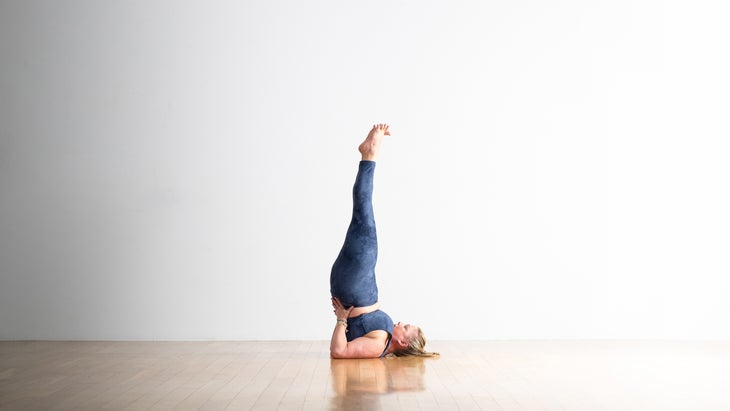
Salamba Sarvangasana (Supported Shoulderstand)
While Shoulderstand may seem to be all about getting your feet up in the air, the complexity of the pose is in the positioning of your shoulders and neck. Rotating your arms externally and drawing your arms and shoulder blades close to each other creates a more stable foundation for the pose. You should have space between the nape of your neck and the floor, and between your chin and your throat. If needed, lie on 2 or 3 folded blankets stacked beneath your shoulders so your head rests on the mat. Using those props helps to ensure your neck maintains its natural curve.
- Lie on your back. (If you’re using blankest, stack them one on top of the other with the rounded edges aligned. Lie on the stack so that the top of your shoulders rests at the edge of the blanket. Allow the back of your head to rest on the floor.)
- Rest your arms on the floor alongside your torso. Turn your palms down.
- Bend your knees and place your feet on the floor with your heels close to your sitting bones. Exhale, press your arms against the floor and draw your knees into your chest, lifting your pelvis and your lower back away from the floor and drawing your knees toward your face.
- Bend your elbows and bring your hands up to support your back. Walk your hands toward your shoulder blades as you continue to raise your pelvis over your shoulders, so that the torso is relatively perpendicular to the floor.
- Press the backs of your upper arms actively into the blanket support. Rock a little left and right to tuck your upper arms under you and shift your weight onto the tops of your shoulders.
- Inhale and lift your bent knees toward the ceiling, bringing your thighs in line with your torso and hanging the heels down by your buttocks. Press your tailbone toward your pubis and turn the upper thighs inward slightly.
- Finally inhale and straighten the knees, pressing the heels up toward the ceiling. When the backs of the legs are fully lengthened, lift through the balls of the big toes so the inner legs are slightly longer than the outer.
- Firm the shoulder blades against your back. Move the sternum toward the chin. Keep your chin perpendicular to the ground and gaze toward your chest.
- Stay in the pose for about 30 seconds. To come down, exhale, bend your knees into your torso again, and roll slowly and carefully onto the floor, keeping the back of your head on the floor.
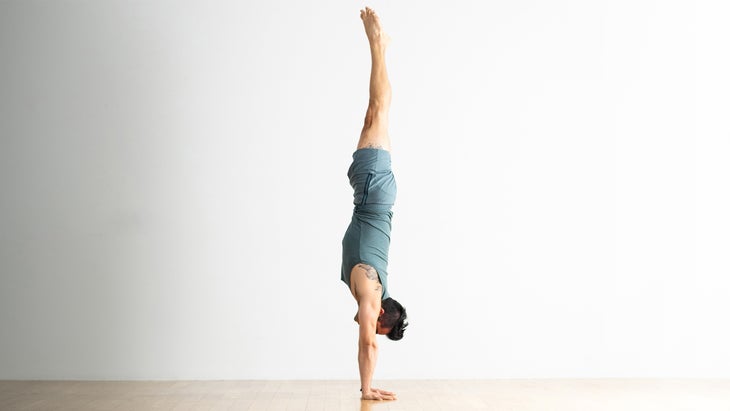
Adho Mukha Vrksasana (Handstand)
You’ve seen people kick themselves up into Handstand and totter around on their hands to find balance. There’s a world of difference between that and the practice of yoga practitioner who positions their hands and arms carefully, engages the abs, and slowly lifts their legs carefully into the pose, finding balance at every step along the way. Both ways are fun, but the latter is an exercise in paying honest attention to how you enter, work in, and exit a pose.
- Begin in Downward-Facing Dog. Make sure your wrist creases are parallel to the front edge of the mat. Turn your upper arms forward toward the wall in front. Press down through your hands especially through your pointer fingers and thumbs.
- On an inhalation, lift your heels. On an exhalation, step your right foot 1/3 to 1/2 of the way to your hands and shift your shoulders forward so that they are directly over your wrists. Bend your right knee slightly, but keep your left leg straight.
- At the end of your next exhalation, lift your left leg into Standing Splits, keeping your shoulders over your wrists.
- Press down into your hands and straighten your arms. Fix your gaze on a point between and slightly ahead of your index fingers.
- Focus on lifting up through your left inner thigh as you bend your right knee deeply and bring your shoulders over your wrists.
- Keep your gaze steady and engage your core as you start to push away from the floor with your right foot. Do not focus on kicking your right leg overhead. Instead, focus on slowly lifting it. You can keep your right knee bent and draw it into your chest prior to straightening your leg. Keep your focus on bringing your hips over your shoulders.
- When you are able to bring your right leg alongside your left, bring your legs together. Draw your low belly in and reach your tailbone toward your heels. Use your core muscles to maintain a neutral spine and level pelvis. Lift your heels away from your shoulders and point your toes toward the ceiling.
- Remain here for 5–8 breaths. To exit the pose, slowly release one leg at a time to the floor and pause in Standing Forward Bend.

Savasana (Corpse Pose)
Savasana is so deceptively simple that it hardly seems to be a pose at all. But relaxing into this asana can be a mental and emotional challenge if you have a lot on your mind or on your heart. And inner turmoil can also make it physically difficult for some people to stay still. Look at Corpse Pose as an opportunity to practice getting quiet and going within to explore who your are and what you need.
- Sit on the floor with your knees bent, feet on the floor. Lean back onto your forearms.
- As you inhale, slowly extend your legs with your feet apart and toes turned.
- Narrow the front of your pelvis and soften (but don’t flatten) your lower back. Lift your pelvis off the floor, slightly tuck your tailbone. (You may use your hand to sweep your buttocks away from your lower back. ) Lower your pelvis.
- With your hands, lift the base of your skull away from the back of your neck creating length. If it’s more comfortable, support your head and neck with a folded blanket. Make sure your shoulders are down and away from your ears.
- Reach your arms toward the ceiling, perpendicular to the floor. Rock slightly from side to side and broaden the back ribs and the shoulder blades away from the spine. Then release your arms to the floor, angled evenly away from the sides of the body.
- Turn your arms outward and extend them toward to bottom of the mat. Rest the backs of your hands on the floor. Make sure your shoulder blades rest evenly on the floor.
- Soften your mouth and tongue, and the skin around your nose, ears, and forehead. Let your eyes sink to the back of your head, then turn them downward to gaze toward your heart.
- Stay in this pose for at least 5 minutes.
- To exit, exhale and gentle roll onto one side. Take 2 or 3 breaths. With another exhale, press your hands against the floor and lift your torso, bringing your head slowly after.
To learn more about satya, read “I Learned to Taste the Fruits of Truthfulness” by Susanna Barkataki.
For more in-depth instruction for the poses above, visit the Yoga Journal Pose Library to access video tutorials, pose variations, detailed anatomy information, and more.
Tamara Y. Jeffries—a yoga instructor, writer, and editor—is a Yoga Journal senior editor.