
Last Updated: February 16, 2022

Activity 5: Create Work Breakdown Structure
Application 3 - Display Outline Numbers and Create WBS Codes (jump to)
Outline Numbers and WBS Manager Simulation (15 minutes) (jump to)
Finalized Updates to the MS Project Master Class Plan.mpp (jump to)
Activity 5: Create Work Breakdown Structure Exam (jump to)
Review of Best Practices (jump to)
Simulation Files (jump to)
Process Bridge (jump to)

Create Work Breakdown Structure Workflow
Review
Review and learn the Create Work Breakdown Structure workflow below in Figure 12.

Figure 1. Activity 5 in Project MAP.

Note: This is Activity 5: Create Work Breakdown Structure in the Project MAP project lifecycle.
Traditionally, a Work Breakdown Structure is an organizational chart. The Title of the project is the top node. In Microsoft Project, this Title or top node in the organizational chart is called the Project Summary Task.
Viewing the Project Summary Task is a display option and turned on under the Format tab on the ribbon when a task-based view is applied or in Options / Advanced / Display options for this project:.
After displaying and appropriately naming the Project Summary Task, define the Major Phases of the project at Level 1 in the outline. In Microsoft Project, these are Summary Tasks located in the structure or outline at Level 1.
These phases are also called Major Deliverables by some project management practitioners because there is a deliverable at the end of each Major Phase or Major Deliverable. For instance, at the end of Phase 1 - Strategic Plan in the figure below, there could be a completed Strategic Plan document. Something tangible, something in your hand.

Figure 3. Level 1 and Outline Level field.
A Major Phase is then broken down further to Activities and Milestones. Activities and Milestones may be grouped under Summary Tasks.
A project is constrained by time, cost and scope. These constraints are often referred to as the Triple Constraints of a project. The Work Breakdown Structure defines the Scope of a project by breaking the project down to the detail level. This is called a task or detail task in Microsoft Project. This is a task of some duration, and nothing indented below it.
Timing, Costs and Scope also constrain each Activity, or detail task, in the WBS. The sum of the entire WBS is the Scope of a project.

Figure 2. Triple constraints with WBS defining Scope.
Other names often used for Activities are: Terminal Elements and Work Packages.

Journal (10 minutes)
When I first started consulting and training on Microsoft Project, I would have been surprised at the time that I would have become so flexible on how people use the software. Paradoxically, at the same time, I have become doctrinaire about the right way to apply specific project management tools and techniques. Creating a WBS is one of those areas that must be done correctly. Otherwise, the project will likely become twisted into meaningless tangles later in the planning phase.
Can you think of a better workflow for Activity 5, when you create your work breakdown structure? If yes, what is that workflow?

Best Practice
A project should be broken down to a level so that: 1) you are confident with your estimates, and 2) you can communicate effectively about the project.
You should be able to say with confidence, “If we complete all of the Activities and reach all of the Milestones in the Work Breakdown Structure, within the triple constraints of the project, the project will be successful.”

Activity 5 Workflow Simulation (15 minutes)

Download*.mpp
To start this simulation, download the Residential Construction.mpp file by using the icon above and opening it in Microsoft Project. Rename the file to 5 - 1 Recurring Task.mpp. Ensure your global settings in Project Options are correct and that you are using Microsoft Project 2019, 2021, or Microsoft 365 updated for best results.
This project plan is based on a template file downloaded from Microsoft.
The Project Summary task is a display feature that can be toggled on and off. Format / Show/Hide group / Project Summary Task.
Notice the numbers in the far left column, the first row is zero, this is the Project Summary task. The top node in a work breakdown structure. Notice it is zero in the WBS field too. (To show the WBS field, select the Task Name header, right-click, select Insert Column, type WBS.) It is called a project summary task because it summarizes the entire project. Zoom the entire project and as you can see, it summarizes the timeline. The project is 152 working days as defined by the project calendar, starts 1/2/23 and finishes 8/1/23.
It is hard for some people to grasp what 152 working days really means, so let’s display the summary task durations in weeks. Open Project Options and select Schedule / Scheduling options for this project / Duration is entered in: and select Weeks. That makes more sense, 30.4 weeks or about 7.5 months to build the house, about how long it takes to build an average stick house in the U.S.
Next, collapse all of the tasks to Level 1 in the outline or WBS. Do this by selecting the View tab / Data group / Outline and selecting Level 1. Notice the features under the Outline command.
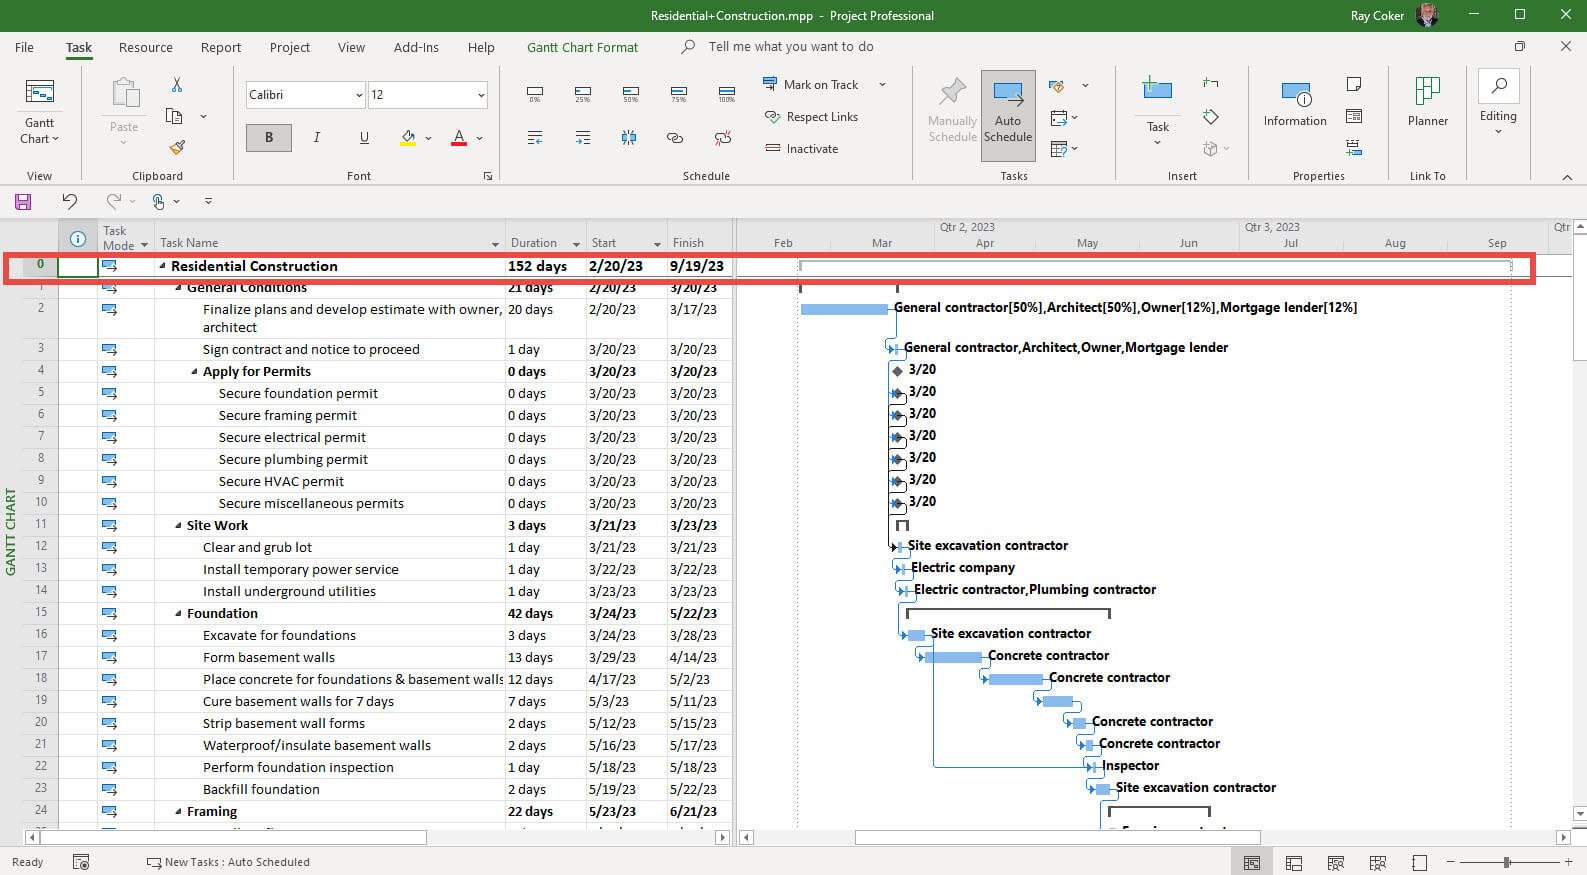
Figure 4. Project Summary Task.

Figure 5. Duration in days, converted to months on the summary level.
Memorize
You will use this feature all of the time. Memorize the location (View / Data / Outline). In fact, you should place this command on the toolbar. From this point forward I will just instruct you to show All Subtasks, or to show Level 2, etc.

Figure 6. Outline command.
Level 1 should be reserved for the phases of your project, but there is nothing unique about these tasks, other than being Summary Tasks when tasks are indented below them. They are summary tasks because they have tasks indented below them, not likely but you could have detail tasks and milestones at Level 1.
Go down to Interior Finishes and expand that summary task. The next level are another group of phases or summary tasks. Below those are detail tasks and milestones.
A detail task is a task of some duration and nothing indented below it. Milestones are detail tasks with zero duration. It is at this detail level that you do all of your work in Microsoft Project. It is where you enter estimates, assign resources, enter timing constraints and link. Typically, don’t do anything to summary tasks, just let those task summarize.
There is one other type of task in Microsoft Project that you might include in your work breakdown structure and that is a recurring task. Let’s say that you like to meet every two weeks with your project manager and the customer you are building the house with. You could make that a recurring task.
Go down to the blank row below the Final Acceptance phase and insert a Recurring Task (Task / Insert group / Task / Recurring Task).
Name this On-site Review.
Enter a Duration of 3hrs.
It is going to occur every 2 weeks on Friday.
Click Ok, and then zoom the selected task.

Figure 7. Recurring task.

Figure 8. Moving a summary task.
You have just scheduled 15 on-site meetings. Collapse the On-site Review summary task and move the task to the top of the phases. Do this by selecting the entire row, moving your cursor to ID number (111), when the move tool appears, click hold and drag the row to the top. In the figure above the gray line is what appears when you are moving the row. A task or summary task can be moved like this.
Review
Let’s go back an Activity and talk about how important some of the calculation settings in Option are. Above, you changed the summary tasks to display months in the duration column, and it converted the duration to 7.6 months for the project. How did it know how to do that? What was the basis of the conversion? Where are those calculation settings?
If you answered, duration conversions in Options / Schedule / Calendar options for this project, you would be correct.
The default number used in the Days per month field is 20. That might be the average number of works at Microsoft. In the book “The Everything Store,” on the history of Amazon by Brad Stone of Bloomberg Businessweek, he claims that Jeff Bezos liked to say that he didn’t want the company to become “a country club” like Microsoft on the other side of the lake, where people who had worked hard to build their careers went “to retire.” For many Americans, the average number of workdays per month is closer to 21.5 per month. The entry does not allow fractions. Enter 22, and click OK.
In some countries, the number of workdays is less than in the U.S. Costa Rica, which I frequent, has ten national holidays, but along with a monthly bonus at Christmas, and two weeks of vacation, and a week off for Easter, the number of workdays per month is closer to 19. In some European countries, the hours per week are 37 - 38 and the workdays per month slightly less than 19.
Save this project
Simulation Results
For the 5 - 1 Recurring Task.mpp file, the first task should be the recurring three-hour On-site Review. The duration of the project is 6.91 months.
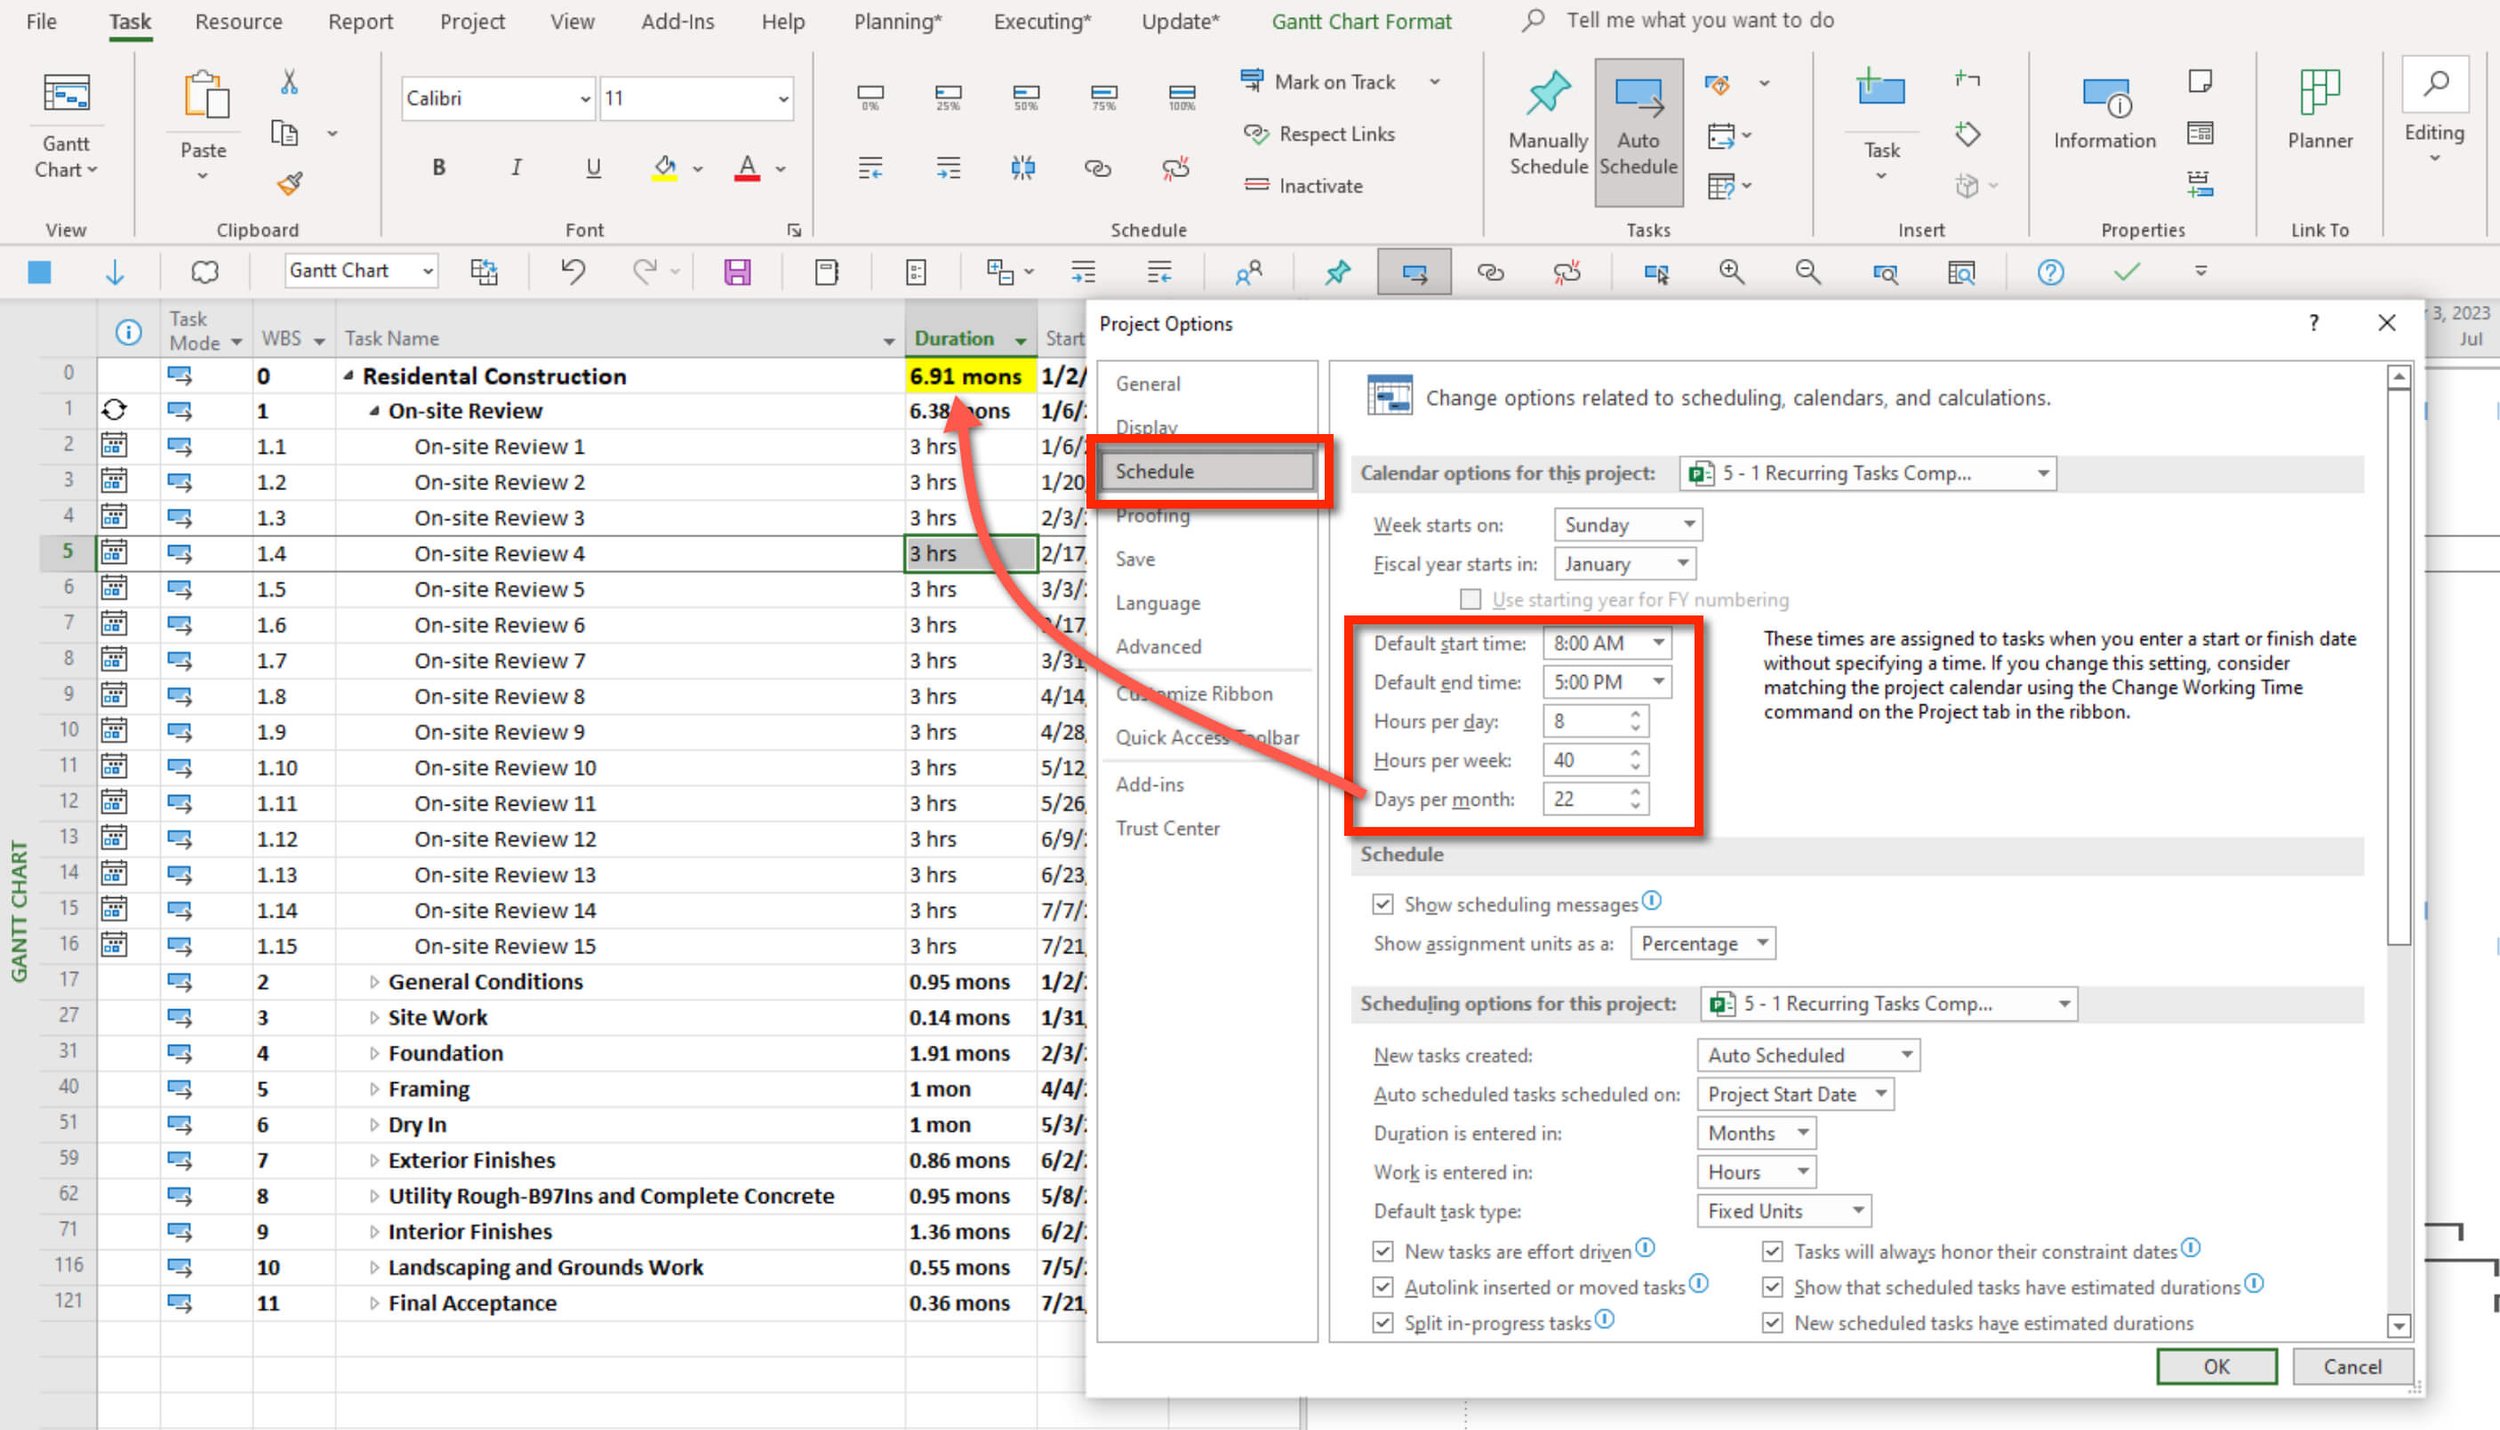
Figure 9. Duration conversion in MS Project.
Last, open the MS Project Master Project Plan.mpp file you downloaded in the previous Activity.
Show just Level 1 above by selection View / Outline / Level 1. Level 1, or the phases of this project are the major sections of the Master Class Book.
First, add the other two phases, Executing and Closing to Level 1. These are just detail tasks for the moment. They will change automatically to summary tasks when tasks are indented below them. We could have just inserted a summary task, either way will work, it is really your preference for how you want to do this.

Figure 10. Level 1 in the WBS.
Let’s say you are working with a coach and you are meeting with them each week as you proceed through the Master Class. If you are working with a coach, create a recurring task, name it Coaching Phase, and define it appropriately.
Save this project.

Figure 11. Defining recurring tasks.
Create Work Breakdown Structure Workflow
Figure 12. Work Breakdown Workflow.

Download Workflow as PDF

If you are working with a coach, save and email them this file (5 - 1 Recurring Task.mpp should look like Figure 9). If you are not working with a coach and you are planning to apply to either MS Master Class certificate, archive this completed simulation file so that you can submit it for review.

Return to the Master Class Book and review the next section for this Activity.
Content Links

Summary Tasks in Microsoft Project are any row item that has tasks indented below.
There are two types of Summary Tasks in Microsoft Project and we have added a third classification at Level 1 of the outline. Number three is a distinction we have made, not a type of task in Microsoft Project.
The Project Summary Task, or row zero.
Summary Tasks that summarize Detail Tasks and Milestones indented below it.
The Phases or Major Deliverables of the project at Level 1 in the outline or WBS.

Best Practice
Don’t create redundancy by adding your own Project Summary Task. Instead, turn on the display for the one that Microsoft Project calculates regardless of whether you display it or not.
Level 1 of the Outline should be the phases of the project.
Except for notes, do not add additional detail such as links and resources at the summary level.

Detail Tasks have some duration and no tasks indented below them. We are calling these types of tasks activities. They are also called work packages or terminal elements by some.
For instance, work packages are defined as the smallest unit of work that a project can be broken down into when creating your Work Breakdown Structure (WBS).
Detail tasks, activities, work packages, and terminal elements are all names used for a detail task in MS Project.
It is on these tasks that all of the additional detail is added, such as:
Estimates of duration and/or work
Links
Assigned resources and costs
Thus, the word “detail.”

Custom WBS Codes are outline codes for a project that are more unique than outline numbers. These codes are generated automatically per a standard or classic naming convention but they can be entered manually and can be customized and generated with the WBS Manager.

Milestones are Detail Tasks of zero duration.
Milestones are used to represent work completed or points in time reached in a project.

Recurring Tasks are Detail Tasks or Milestones that occur on an interval of time.

Create Work Breakdown Structure
Review
Read through the Content Links above on Summary Tasks, Detail Tasks, Milestones and Recurring Tasks. (jump to)

Reviewing WBS Simulation (15 minutes)
Likely you already know how to insert and indent tasks, so based on what you have learned, let’s do a critique of several of the Microsoft Project Templates.
Open the Annual Report Preparation template. (File / New and select the Annual Report Preparation template file and then click Create.)
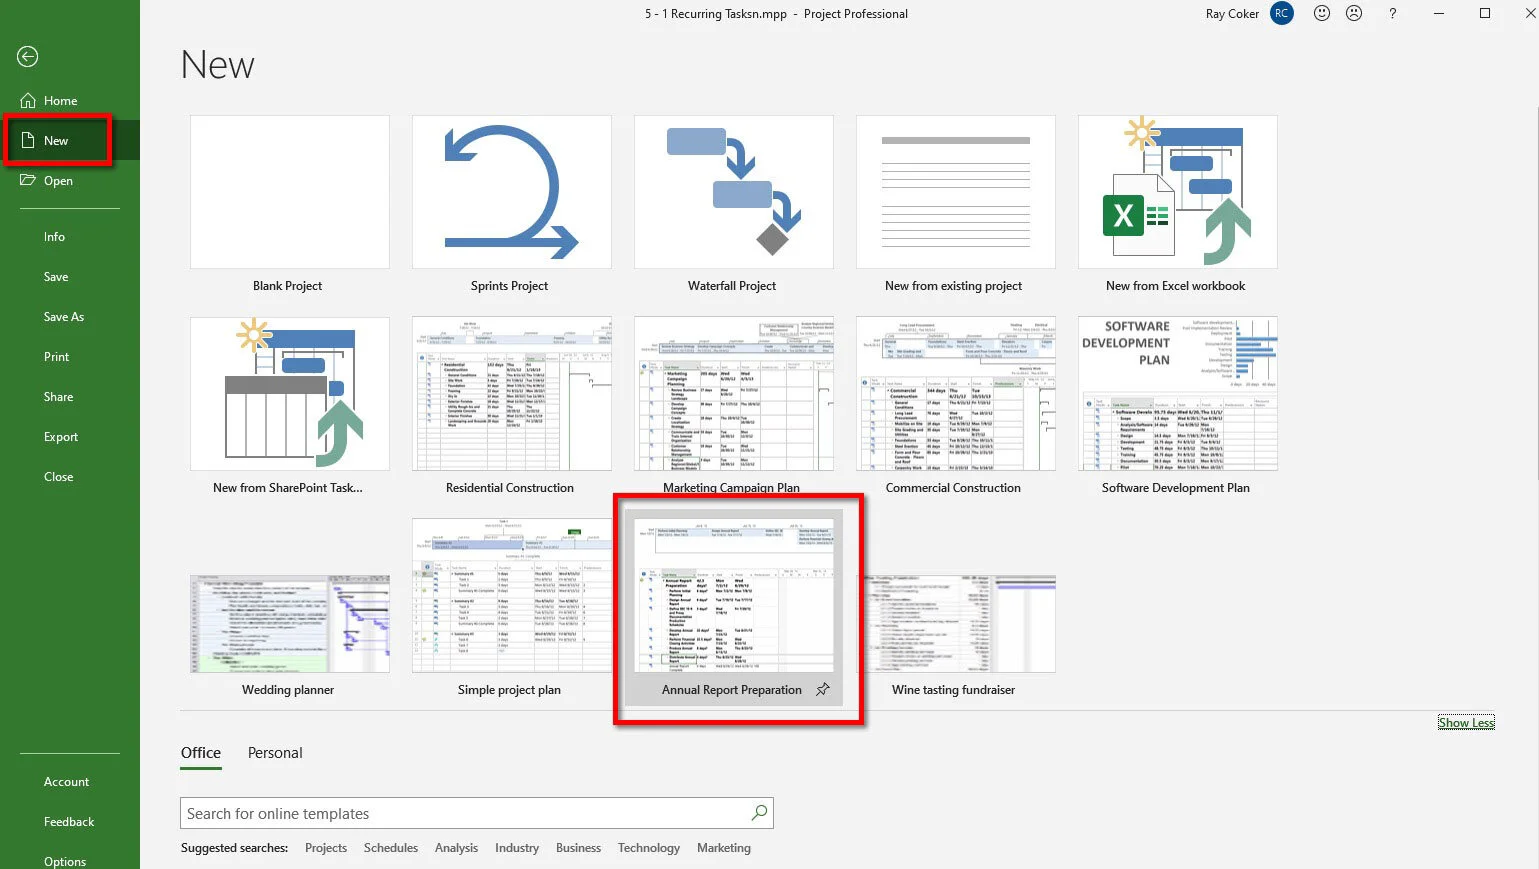
Figure 13. Starting a new project from a Microsoft template.
Does the template show the Project Summary Task?
Is Level 1 just Phases or Major Deliverables? In this case, yes, but the finish milestone is on Level 1. Indent Annual Report Completed placing this finish milestone in the proper location.
Expand the WBS by selecting View / Outline / All Subtasks. Look at the milestones. There seems to be a milestone after each Phase, but that seems a bit excessive on a project that has only 110 elements in the WBS. In addition, one milestone, External Audit Complete, appears redundant. That said, some organizations standardize around milestone reporting, meaning that they only report against milestones. In that case, a milestone after each phase in the project might be appropriate.

Note: You can highlight all of the milestones by selecting View / Data group / Filter / More Filters / select the Milestones filter and then click the Highlight button. Press F3 to clear a filter.
Perhaps a better way to highlight milestones is to change the background color, or the text, of the milestone item. Clear the filter and then change the background of all of the milestones to a different color. To do this you have to edit a Text Styles item. Select Format / Format group / Text Styles / Item to change and select Background Color and change the background color.
While we are at it, notice that Summary Tasks items are already in bold. Also, make the text of Summary Task blue.
Notice an item named Marked Tasks. There are several Yes/No types of fields in MS Project that can be used to flag (there are 20 of these Flag Yes/No fields) tasks manually and either a no or yes associated with that field can be used for filters, highlights, groups, reports.
Change the color of Marked Tasks to dark brown. Then, insert the Marked Tasks column. Search for the word interview in the Task field and select Yes for each task containing that word.
Save this project as 5 - 2 Annual Report.mpp.
Question. If you highlight data in your project by using a filter, who tells the filter what highlight to use? If you don’t know, the answer is in the Text Styles dialog box.
Simulation Results
The 5 - 2 Annual Report.mpp file should have the milestones with a background color selected in Text Styles. Summary Tasks should be blue and Marked Tasks brown. Formatting is shown in the next figure.

Figure 14. Marked Tasks item formatted in Text Styles.
Project Example

I had been doing a lot of work for the Center for Veterinary Medicine, a U.S. Food and Drug Administration branch. One of my contacts had published the annual report for years and was retiring after he finished one more yearly report. He wanted a perfect project plan to hand off to the next person who would publish the annual report.
The idea of an expert plan is a mainstay in project management. Following an expert project plan can turn inexperienced people into expert project managers faster from a planning perspective.
Create a new project from the Residential Construction project template and save the project as 5 - 3 New House.mpp.
Several observations:
As mentioned above, the plan has a Project Summary Task and Level 1 looks good.
Highlight milestones with the Milestones filter.
Change the milestone highlight to light blue.
The only milestones in this project are those for applying for permits. It is unclear why permits would be considered milestones since they take time, money, and effort. It might mean that this permitting work is done by another department and they only provide the manager of this project with the dates. You could easily change these milestones of course.
Project Example
Working for a company that builds apartments in Orlando, they ran two concurrent project files for each building project. One contained all of the permitting tasks and the other the actual construction. Corporate ran the permitting project, project managers in the field ran the construction schedule. The actual permit tasks in the permitting schedule were external predecessors to permit milestones in their construction projects. The permit milestone in this 5 - 3 New House.mpp project could be used this way, with external tasks from another project file driving when these milestone are scheduled in this project.
The project should at least have a completion or finish milestone. Add a Start and Finish milestone. Add the Project Start milestone as the first task in the first phase of the project and add the Project Complete milestone as the last task in the project.
Obviously, one person’s expert plan needs to be adapted for the way a new expert would build a house, but reviewing project plans like this is a great way to develop Microsoft Project planning skills.
Show Level 2 in this project. Some organizations will standardize on Level 1, or Level 2, and in this case, if this company was building 20 homes at any given time, every project should look the same at Level 1 and Level 2. They type of standardization helps improve communication between stakeholders across project. Then, typically, organizations typically allow the project manager to build and then manage the project plan to any level of detail they want after Level 2.
In this project, create an On-site Review recurring task of one hour to run the length of the project as the first phase at Level 1 as we did above. When finished, collapse the recurring task. Make sure the project is showing Level 2 of the outline.
Save the project.
Simulation Results
The 5 - 3 New House.mpp file should show to Level 2 in the WBS. Three tasks were added, On-Site Review recurring task (collapsed), and a Project Start and Project Finished milestones placed appropriately in the WBS. The view should be highlighted with the Milestone filter and the Highlighted Tasks a light blue background color.

Figure 15. Project plan expanded to Level 2, and formatting the highlight for filters.
Create a new project from the Wine Tasting Fundraiser template. Name the project 5 - 4 Wine.mpp.
This project plan demonstrates several flaws unrelated to the WBS, such as links with summary tasks, and semi-flexible timing constraints that likely should not be associated with a template file so it seems to reflect some inexperience by the creator. However, event planning is clearly a project management activity and this template is designed to reflect that fact.
Project Example

My wife has been on the board for several local organizations. As I write, my wife is attending a planning meeting for a gala for the local Humane Society, where she chairs the board. These auctions, balls, and other fundraising events are always a lot of work. I try not to get involved.
No, she doesn’t use Microsoft Project to plan these events.
But, you could! These types of well-planned projects serve the community and become a great way to learn Microsoft Project. Plus, if you do a great job of planning and pulling off a successful event, you can export your plan to Excel as an expert guide for the person chairing the event next year. With 30 million Microsoft Project users, it is increasingly likely they may want the *.mpp file.
First, expand the outline, select all of the tasks (remember how to do that?), and then select Task / Information. Select the Advanced tab and select As Soon As Possible in the Constraint type field. Click OK. Then zoom the entire project.
Insert the Constraint Type column. All rows should be ASAP.
There are improvements that can be made to the Work Breakdown Structure in this template.
Show Level 1.
Remove the three milestones at Level 1 by indenting them.
The phases of the project are similar to Project MAP and the chapters in the Master Class Book. Technically, this isn’t wrong, but from a communication perspective, a reader should get a pretty good idea of what a project is all about by just looking at Level 1. At least change Level 1 to:
Wine Tasting Initiation
Wine Tasting Planning
Wine Tasting Preparation
Wine Tasting Event Day
Wine Tasting Closing

Figure 16. Wine Tasting Fundraiser template.
Expand, or Show all subtasks.
Enter a Start Project milestone and position it correctly.
One of the benefits of WBS is that once it is completed with estimates, resource assignments, and links, all of the details roll up to the Project Summary task defining all of the project constraints. Insert the Work column. As you noticed, the actual wine tasting event is only 3 hours in duration. The existing project is 32 weeks in duration, and there are 1,300 hours of effort or work. Someone will have to sell a lot of wine in a short period to make this a worthwhile fundraiser.
In addition, there is all of this work before the event, and when the event is over, there is a lot more work to do.
Show the duration of the project in Months.
Start the project on November 23, 2023
Highlight the milestones by using the Mileston filter and then save the project.
Simulation Results
The 5 - 4 Wine.mpp file should have only the phases at Level 1. The Start Project milestone was added and milestones highlighted by the Milestones filter. The project starts on 11/23/23. The duration is in months. All timing constraints are ASAP.

Figure 17. Corrected WBS with milestones highlighted.
Memorize
Memorize the five types of tasks in Microsoft Project and a basic definition for each type.
Project Summary Task - Row zero, the display can be turned on or off under the Format tab while in an appropriate view or turned on in Options as a local setting. Options / Advanced / Display options for this project: / Show project summary task. We call this the Project Title.
Summary Task - A task with tasks indented below it. We call Level 1 Summary Tasks, Phases.
Detail Task - A task with no tasks indented below it and with some duration. We call these Activities, mostly because we want to move toward doing project management vs. task management.
Milestone - A task with no tasks indented below it and with zero duration.
Recurring Task - A task that is a set of recurring detail tasks or milestones, such as weekly team meetings.

Creating an MS Project Master Class Project Simulation (20 minutes)
Open the MS Project Master Class Plan.mpp file to start this simulation.
As with any outlining, rules are typically established for the creator to follow to ensure the integrity of the outline. Following the rules makes the outline easier to understand and follow by any reader.
Some general rules of thumb for WBS naming conventions might be:
All tasks stand alone. There are no duplicate names.
The Project Summary Task is the name of the project. Often the organization has already determined a naming convention for project names.
Tasks at Level 1 are nouns, Planning Phase, for example.
Milestones are noun/verb, Design Document Completed, for example.
For example, all other tasks are imperative verb/noun, Complete Design Document.
Figure 18. Example of standard WBS naming conventions.
Using the same naming convention and structure for Activity 4, create the WBS for Activity 5: Create Work Breakdown Structure. The Master Class Book Table of Contents and the outline above for this page should help you. For each activity, use the time estimates in the Master Class Book and the outline above to enter a duration. There is no reason to any linking at this time.
Save your project.

Best Practice
Create a design document detailing the best way to create a work breakdown structure for a particular project. This includes naming conventions, indentation levels, where to place milestones, and formatting.

Journal (20 minutes)
Do you think there are correct and incorrect ways to use Microsoft Project?
It isn’t just Microsoft that takes an unconventional approach to WBS. As I mentioned, I worked for the product group at Symantec that developed the first project management software for the PC. That software also left the development of a WBS entirely up to the user.
Microsoft has often claimed that the flexibility of Project to be used in many ways has been one of the software’s strengths. But for most of us, there are correct and incorrect ways to use the software.
One aspect of creating a WBS or an Outline in Microsoft Project is a set of recommended rules. We have made several recommendations in the Master Class Book and the Online Application.
Do you think there should be a commonly accepted set of rules for creating a Work Breakdown Structure or Outline? If yes, what should they be? In an organization with perhaps a portfolio of hundreds, if not thousands of projects, rules certainly make a lot of sense.
What are the five different types of tasks in Microsoft Project?
For each of these types of tasks, can you identify the fundamental characteristics of each type?
For each of those Microsoft Project task types, what are the more common naming conventions for each task type?
As you enter the Project Title, Phases, Summary Tasks, Activities, and Milestones, what are some suggested rules regarding naming conventions?
There are three essential WBS perspectives: Gantt Chart, Organizational Chart, and PERT Chart or Network Diagram. In project management software, the Gantt Chart is called the central display. This perspective is also called an Outline View. Why is this the primary way of viewing your project versus an Organizational Chart or Network Diagram from a practical standpoint?
Appling the suggested WBS or Outlining rules, open Microsoft’s Wedding Planner template. What WBS suggestions might you make if any?

If you are working with a coach, save and email them these files (5 - 2 Annual Report.mpp file that should look Figure 14, 5 - 3 New House.mpp should look like Figure 15, and 5 - 4 Wine.mpp should look like Figure 17). If you are not working with a coach and you are planning to apply to either MS Master Class certificate, archive these completed simulation files so that you can submit them for review.

Return to the Master Class Book and review the next section for this Activity.

Display Outline Numbers and Create WBS Codes
Review
Read the Content Link above on Custom WBS Code. (jump to)

Outline Numbers and WBS Manager Simulation (15 minutes)
To start this simulation, download Microsoft’s Software Development Plan template file. Rename the file to 5 - 5 WBS Manager.mpp. Ensure your global settings in Project Options are correct and you use Microsoft Project Standard or Professional 2019, 2021, or Microsoft 365 updated for best results.
There are four sets or types of numbers for all elements in a Microsoft Project WBS.
A - Four types of numbers are associated with tasks: ID, Unique ID, Outline Number, and WBS code. In the figure below, two ID columns are displayed. The table definition locks the first one, and the other is inserted as a regular column in the table.
Insert all of these columns.
B - All rows or tasks have unique IDs. Microsoft Project generates these numbers. A task ID, Outline Number, and WBS renumber based on changes to the WBS. Unique IDs never change and are typically used for importing/exporting and database management. I moved Unique ID 10 up the WBS in the figure below. The ID changed to 9, but the Unique ID stayed the same.
C - There is an Outline Number. Microsoft Project generated these outline numbers based on a task’s position in the WBS. Under the Gantt Chart Format, if the Outline Number is checked, those numbers appear before each task name.
The WBS Manager generates the WBS codes in the figure below. If the WBS changes, the Renumber… command needs to be selected.

Figure 19. All of the types of numbers for tasks.
Let’s suppose you are deploying a software system for your company in several different countries. You plan on having a project for each country deployment and you would like to combine all of the projects into a master project for reporting and resource leveling since some members of the team will be assigned across all projects. There are also some resources working across the deployments and you want to make sure those resources are not scheduled to be in two places at the same time.
You believe that if each project has a unique WBS code, it will be easier to distinguish one project from another.
Use the WBS Manager to develop a unique WBS code.

Note: This feature is no longer called the WBS Manager. Now, it is just viewed as an action, and the command is Project / WBS / Define Code… A search in MSP for the WBS Manager will still return the Define Code…command.
First correct any problems you might notice with Level 1 project phases.
Open the WBS Manager at Project / WBS command in the Properties group / Define Code. Match the Code Preview to the example below.
Generate the WBS codes and save the project.
Simulation Results
The file 5 - 5 WBS Manager.mpp should have the same WBS definition at the figure above. In addition, Level 1 should be defined correctly.

Figure 20. WBS Code Preview.
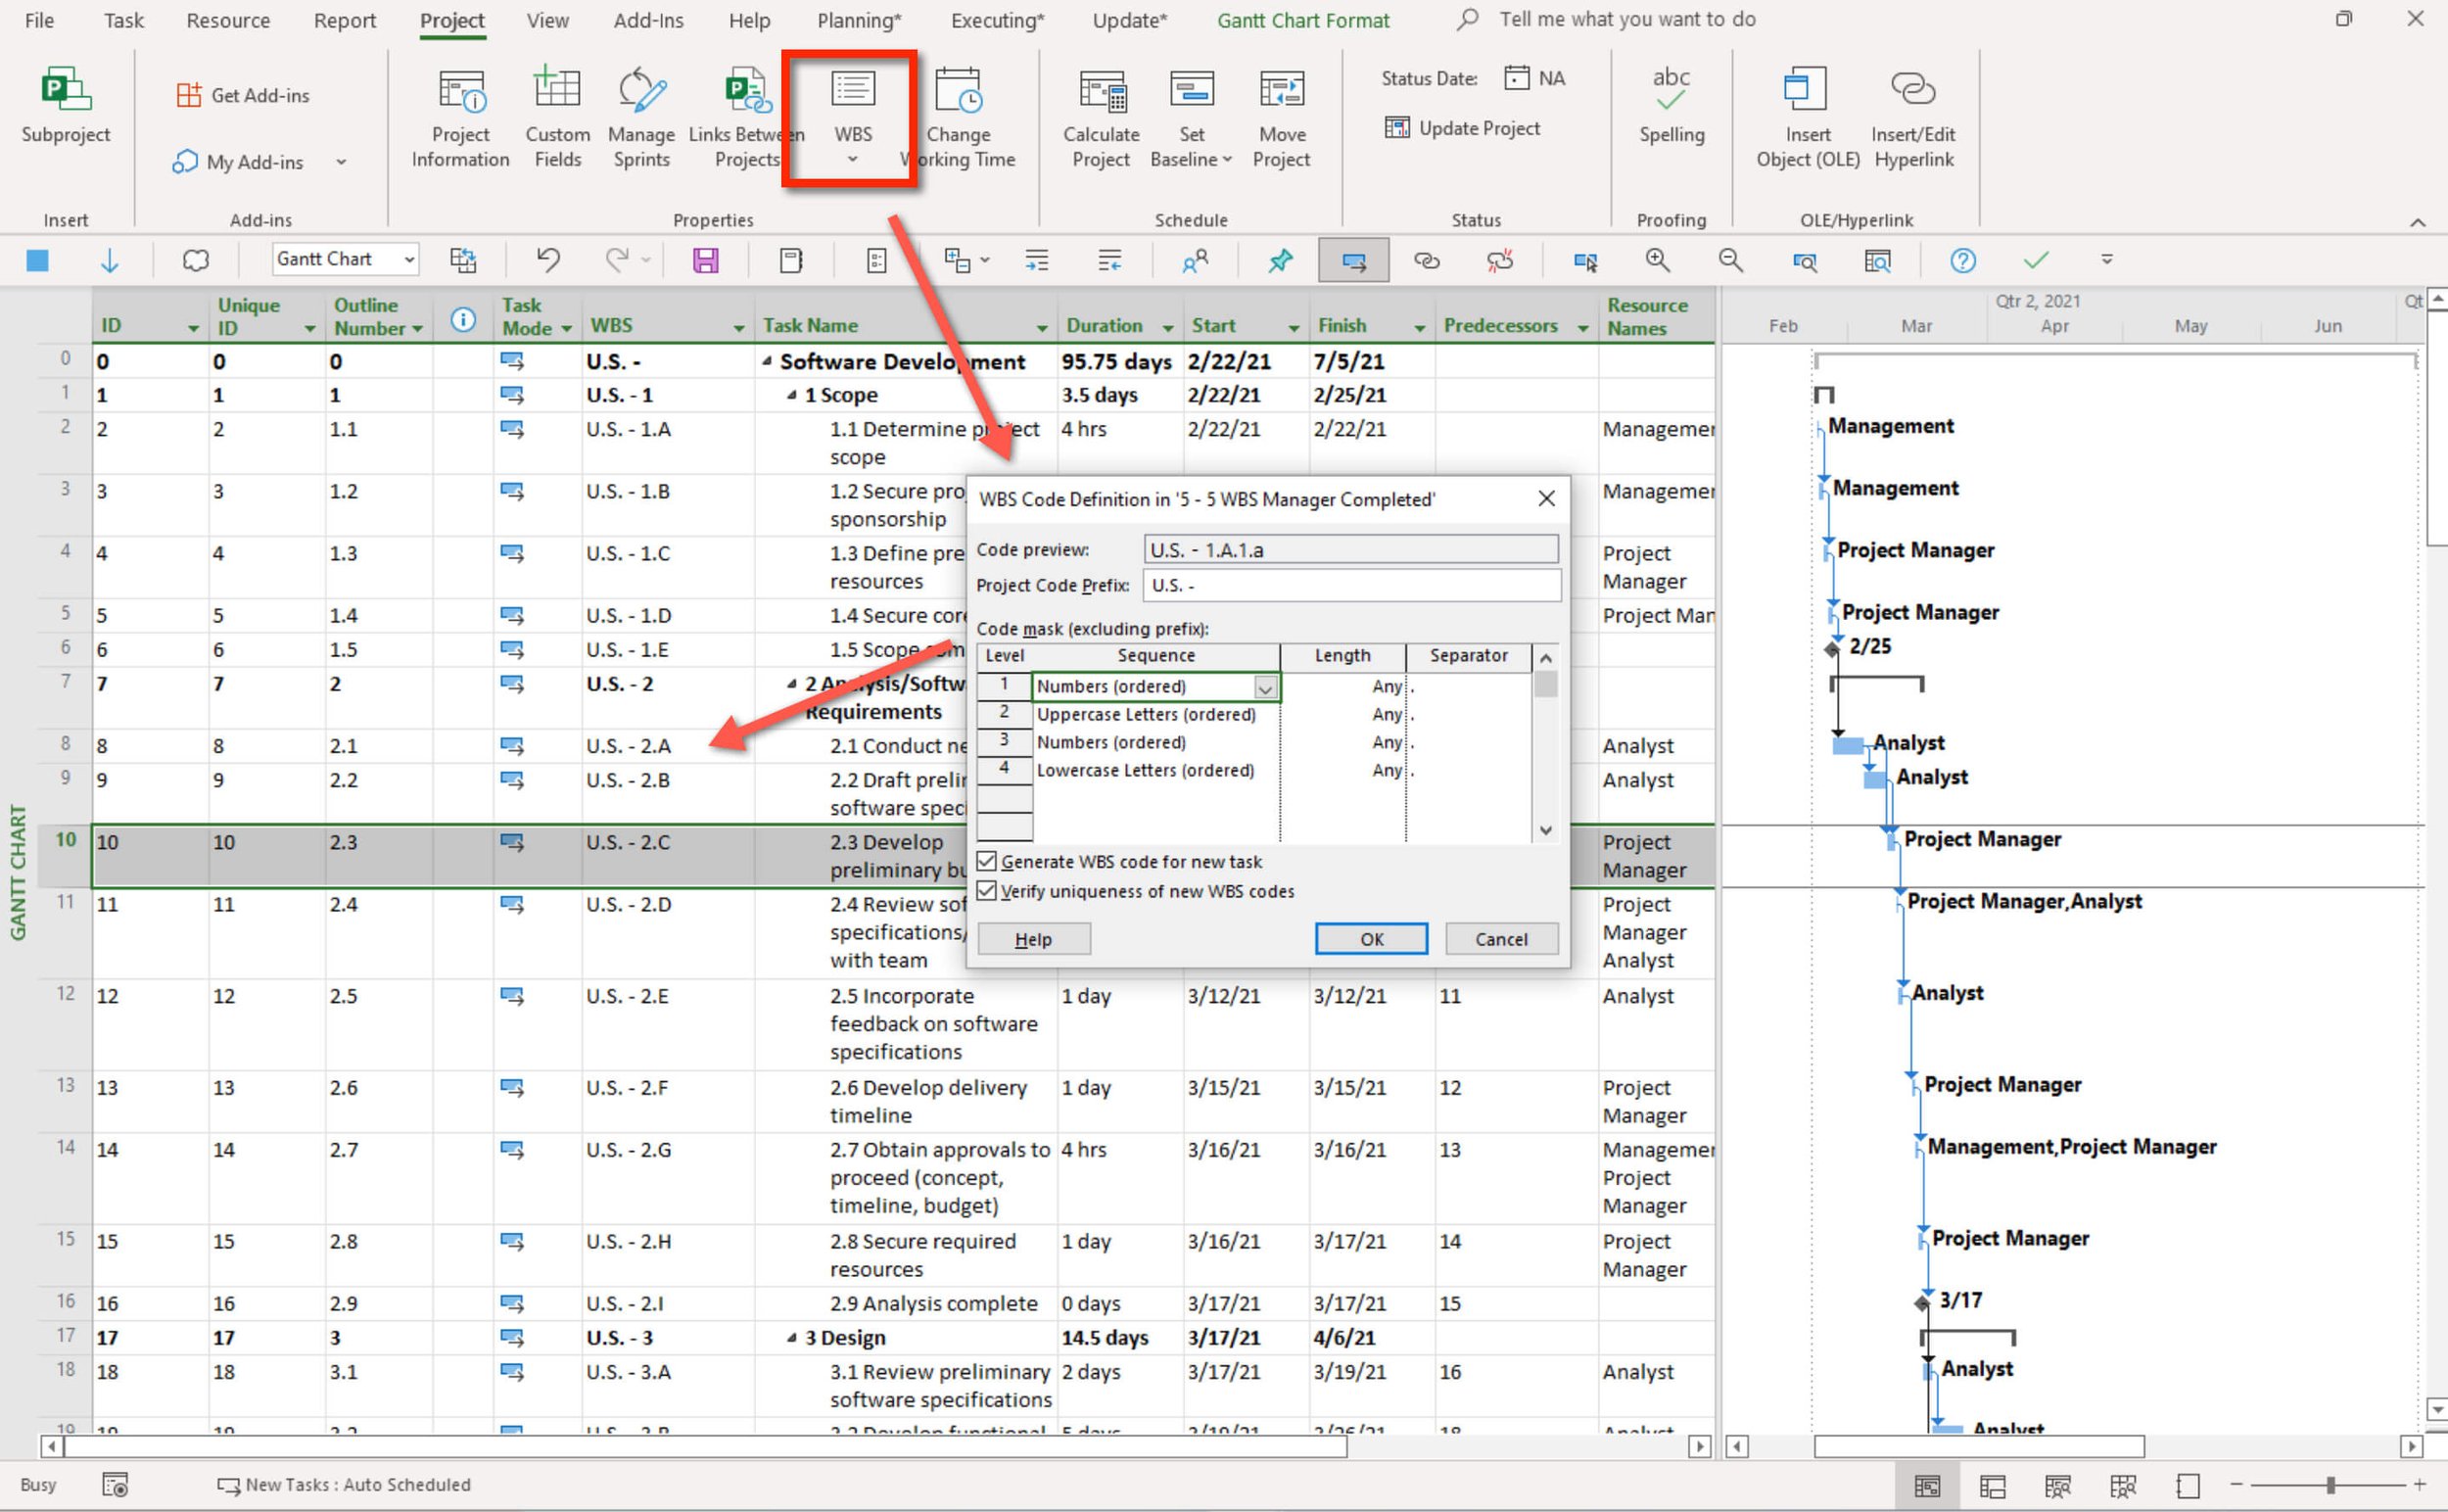
Figure 21. Custom WBS code.
Finalized Updates to the MS Project Master Class Plan.mpp
Open the MS Project Master Class Plan.mpp. The WBS should be completed up the Activity 5: Create Work Breakdown Structure. Use the time estimates in the Master Class Book and the outline at the top of this page to enter duration estimates.
In the Timesheet column, enter how much actual time you spent on these tasks through this Activity. Don’t enter information on a summary task (a task with task indented below it). The is no need to link tasks.

Journal (5 minutes)
Do you think you will ever use WBS Codes? If you said no, likely you never will. Not long ago, some project managers build projects against a codebook. For instance, at 4.6.2, they need a task that specifies the constraints for framing the foundation.
However, there are some practical uses for these codes. Can you think of any?
What are the different types of numbers for tasks, what are the differences between them?
How do you redefine custom WBS Codes?

If you are working with a coach, save and email them these files (15 - 5 WBS Manager.mpp should look like Figure 21, and MS Project Master Class Plan.mpp should be updated). If you are not working with a coach and you are planning to apply to either MS Master Class certificate, archive these completed simulation files so that you can submit them for review.

Return to the Master Class Book and review the next section for this Activity.

Review of Best Practices
How far do you break down a project?
Until you are confident in your estimates and you are able to use the project to communicate effectively with all stakeholders.
A project should be broken down to a level so that: 1) you are confident with your estimates, and 2) you can communicate effectively about the project
Major Phases
Level 1 of the Outline should be the phases of the project.
Milestones
There are no rules governing the use of milestones. In general, milestones are used for communication purposes. Don’t stuff your WBS with needless milestones unless required for milestone reporting.
Project Summary Task
Don’t create redundancy by adding your own Project Summary Task. Instead, turn on the display for the one that Microsoft Project calculates regardless of whether you display it or not.
Scope
You should be able to say with confidence, “If we complete all of the Activities and reach all of the Milestones in the Work Breakdown Structure, within the triple constraints of the project, the project will be successful.”
Summary Tasks
Except for notes, do not add additional detail such as links and resources at the summary level.
Work Breakdown Structure
Create a design document detailing the best way to create a work breakdown structure for a particular project. This includes naming conventions, indentation levels, where to place milestones, and formatting.

Activity 5: Create Work Breakdown Structure Exam
Complete this Activity by taking the exam in this Master Class.

Figure 22. Activity 5 exam.
Simulation Files
If you are working with a coach and are sending them all of your files at the end of each Activity, or archiving your files because you are going to earn a certificate, these are the files for this Activity:
MS Project Master Project Plan.mpp (This file should have a WBS through this Activity. Each detail task should have a duration estimate based on the table of contents in the Master Class book and the outline at the top of this page. The actual time you spend on each task should be entered.)
5 - 1 Recurring Task.mpp (This file should look like Figure 9).
5 - 2 Annual Report.mpp (This file should look like Figure 14).
5 - 3 New House.mpp (This file should look like Figure 15).
5 - 4 Wine.mpp (This file should look like Figure 17).
5 - 5 WBS Manager.mpp (This file should look like Figure 21).

Using Process Bridge? Its easy to follow the workflow…

Figure 23. Activity 5: Work Breakdown Structure workflow.
A - The Create WBS floating toolbar is under the Planning tab on the ribbon. In the Activity 5: Create WBS group, the WBS command opens a task sheet view for just working with the WBS.
B - Create WBS floating toolbar.
C - From the floating toolbar…
View the Create WBS workflow online.
Open the WBS Manager and Renumber.
Show or Hide the Project Summary task.
Insert a Summary task.
Insert a Detail task.
Insert a Black row.
Delete a selected row.
Indent and Outdent.
Click on the Create WBS Bar command under the Planning tab to open the floating toolbar. Select the Create WBS Workflow radio button to view the workflow online.

Figure 24. Create WBS workflow online.
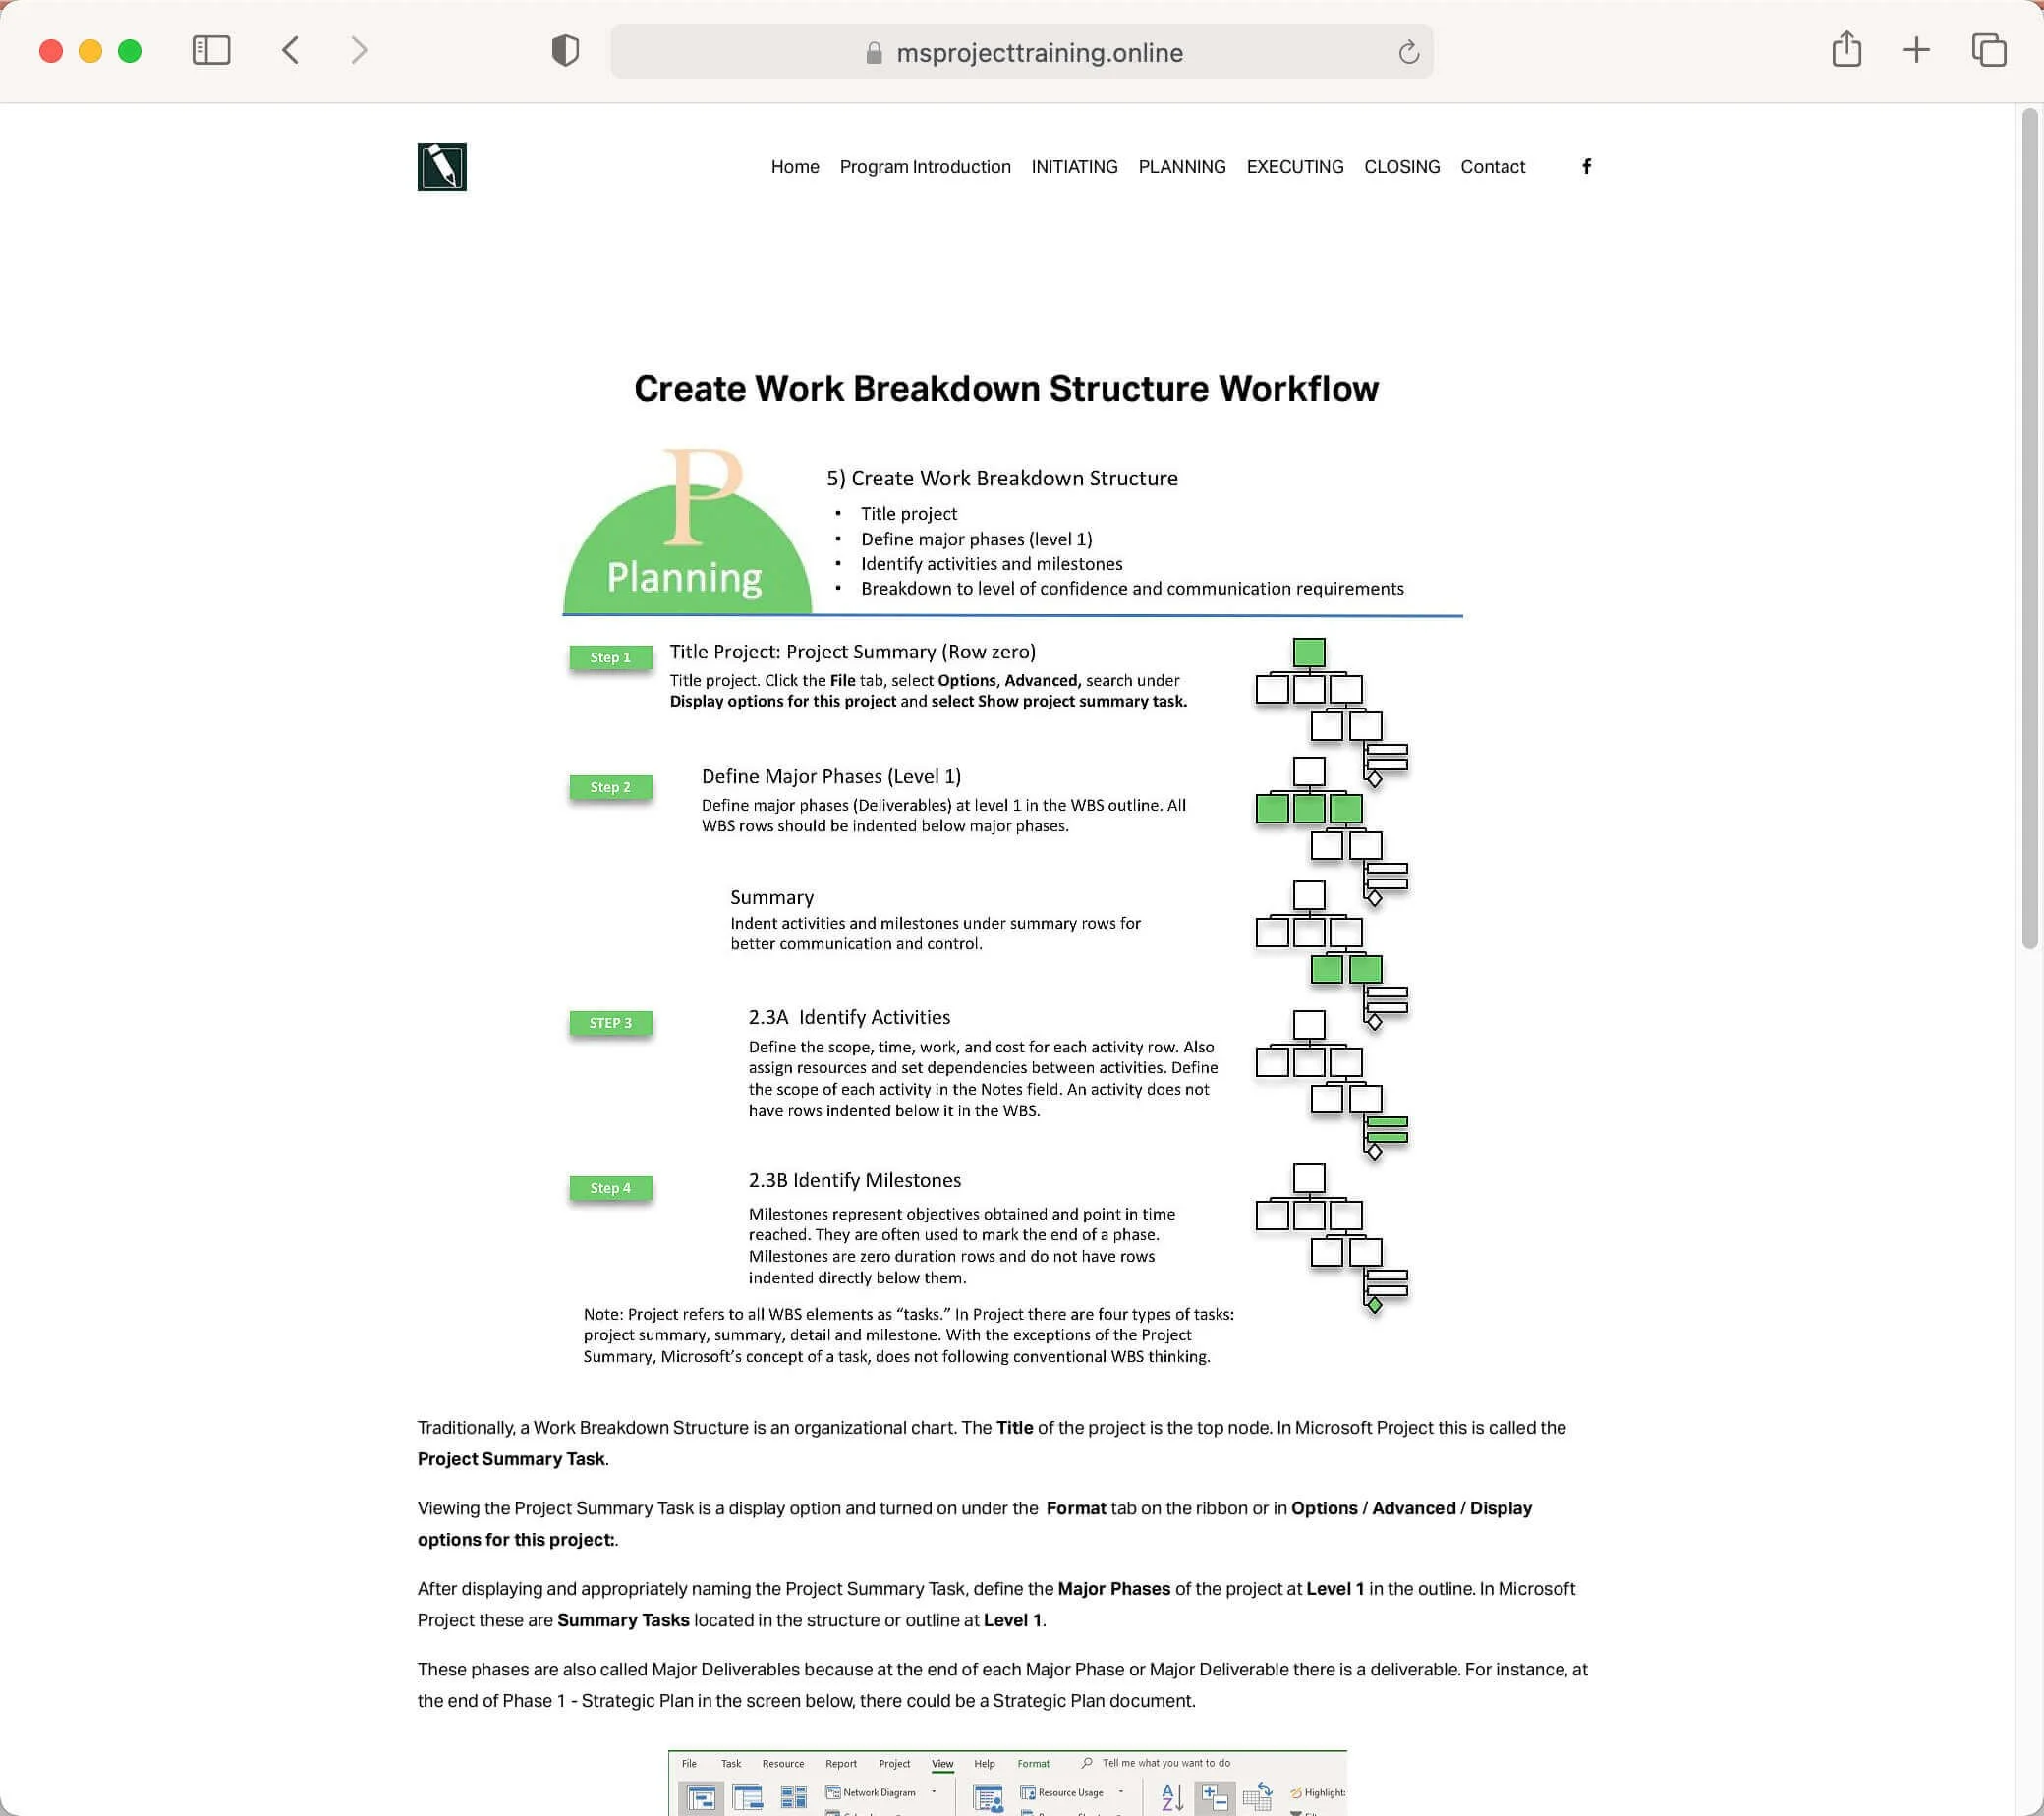
Figure 25. Create WBS workflow online.
Click on the WBS command on the ribbon or the Apply WBS View on the toolbar to apply a task sheet view that only displays the ID, Indicators, WBS and Task Name columns.

Figure 26. WBS task sheet view.
Open the WBS Manager by clicking the WBS command under Project or the WBS Manager radio button on the floating toolbar. If you generate your own codes and then alter the structure by inserting, moving or deleting tasks, Renumber the WBS.

Figure 27. WBS Manager and Renumber.
Insert and Indent and Outdent tasks (rows). Inserting a Blank Row is often used to visually separate parts of the WBS. Clicking on a blank row can easily turn the row into a task. If that happens, delete the row and insert a blank row again.

Figure 28. Inserting tasks (rows) in the WBS.