- How to install a Proxmox high-availability cluster - Wed, May 1 2024
- Assigning proxy settings in Windows automatically with a PAC File - Mon, Mar 25 2024
- Install WireGuard VPN on OPNsense Firewall - Thu, Feb 29 2024
If the hosts run on different operating systems, you'll need to find the appropriate methods for file transfer. If you use external storage devices for the VMs and want to mount them on another host, the file system must be compatible with the target host.
Regardless of the method you choose, the VM must be shut down and turned off.
Method 1: Copy VM Files and .vbox to target computer
When moving VMs between different hosts or re-registering a VM on the same host, the vbox file in the VM directory plays a critical role. This plain text file contains all configuration data, including the virtual drive, memory size, screen resolution, network settings, and the virtual hardware in general.
To transfer a VM to another computer, you need to copy the VM folder, including the .vbox file, to the other computer, or, if it's on an external drive, connect it to the remote computer.
Registering the VM in VirtualBox after the Transfer
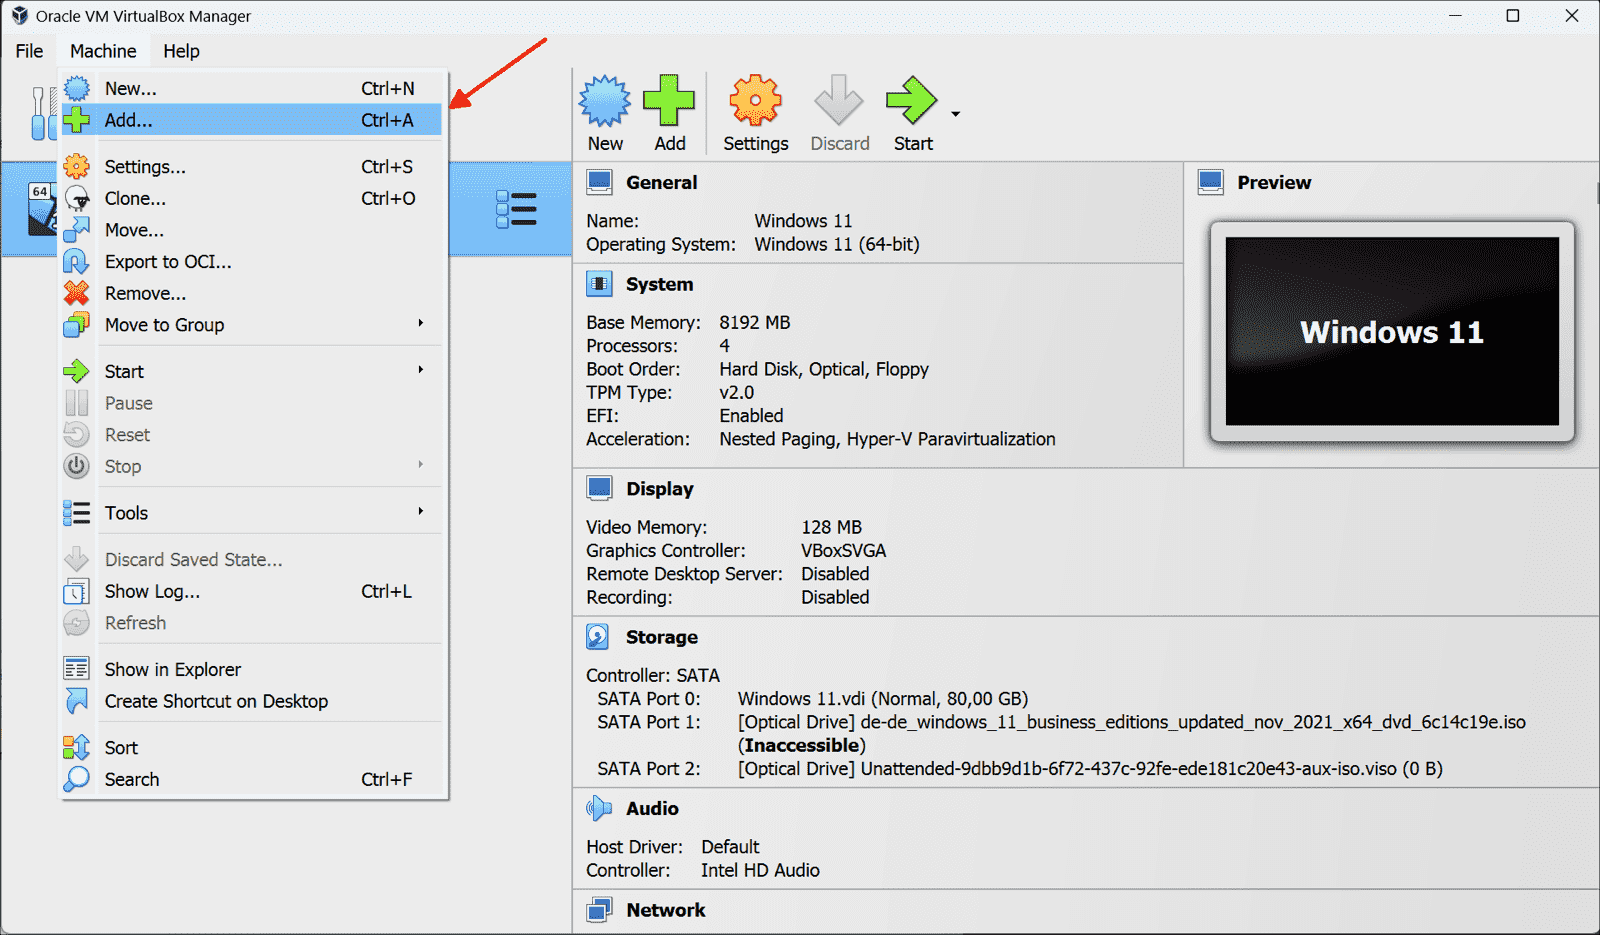
To reconnect a VM or import it on another computer, select Machine => Add in VirtualBox.
Then choose the .vbox file of the VM and add it. Alternatively, double-clicking the vbox file will suffice if the file extension is associated with VirtualBox.
It's crucial that all other VM files, including the virtual hard drive image and the NVRAM and vbox-PREV files, are in the same directory since they're linked to the VM. Generally, it's a good idea to check the VM's configuration after moving, especially the settings for the virtual networks.
Registering the VM in Terminal or command line
Another option is to register a VM using the command-line tool vboxmanage.exe, located in the VirtualBox installation directory.
To register a VM, enter the following command:
vboxmanage registervm <path and name of the vbox file>
Method 2: Migrating VM as an Appliance
Another way to migrate a VirtualBox VM to another host is to export the VM as an appliance. Start the process in VirtualBox via File => Export Appliance.
This launches a wizard where you first choose which VM to export. Using the Expert Mode button gives more control options, but the default guided mode is usually sufficient.
In the next window, select the directory and format to which you want to export the VM. Typically, you'll choose the "Open Virtualization Format 1.0."
Afterwards, transfer the OVF appliance to the desired computer to import the VM there. On the next page, you can adjust settings and manage the appliance's description.
The assistant then exports the VM as an OVA file.
Importing Virtual Appliance
Conversely, you can then operate the VM on the target host using the command File => Import Appliance. Again, it's essential to check various settings.
If both hosts are on the same network, adjusting the name and IP addresses is necessary.
Conclusion
VirtualBox runs on hosts with various operating systems but uses the same format for all VM files (configuration, virtual drives, etc.). Thus, virtual machines can be easily moved between various hosts.
Subscribe to 4sysops newsletter!
There are two methods for this purpose. First, you can copy the folder with all VM files to the target host and re-register the virtual machine there. Alternatively, you can export the VM as a Virtual Appliance and import it on the target computer.
IT Administration News
- Public preview: Expanding passkey support in Microsoft Entra ID – Microsoft Community Hub
- Introducing organizational messages (preview) in the Microsoft 365 admin center – Microsoft Community Hub
- Eight newspaper publishers sue Microsoft and OpenAI over copyright infringement NBC Los Angeles
- Whats New in Microsoft Teams | April 2024 – Microsoft Community Hub
- Microsoft SharePoint Roadmap Update – May 2024 – Microsoft Community Hub
Join our IT community and read articles without ads!
Do you want to write for 4sysops? We are looking for new authors.


-480x270.png)


